
likely to encounter several issues that may have different impacts on the project. These may come in the form of unseen problems, inconsistencies, gaps, or conflicts as the project progresses.
Issues can also include a shortage of resources or problems with the staff. When these issues are left unsolved, there is a high chance that the project may face delays and even fail to produce the deliverables.
How then can a project manager deal with these issues? In this article, we look at the issue log and everything you need to know about it to help you understand issue management in the project lifecycle. We will look at what it is, why it is necessary, how you can create one, and any other information that you may find worthy. Let’s get started!
What is an Issue Log?
Also known as the issue register, this document captures all the issues arising in a given project. It maintains a record of problems encountered during the project lifecycle. Not all cases make the cut, as the register only has room for those requiring formal action.
This document is used for projects in different industries. Remember, whereas some issues are general, others are industry-specific. A good example is a given software not being ready for testing for IT development projects. You will not experience such in a construction project.
Any time an issue requiring formal action happens, it must be updated. The project manager then monitors it until the given problem is resolved to prevent it from interfering with the project.
Issue logs mostly come in standalone spreadsheets or a database, even though one may integrate them into bigger project management tools.
Why is an Issue Log Important?
The issue log or register plays a vital role in project efficiency as the project progresses. It addresses issues that may stand in the way of achieving the project’s success or challenge the team operation.
It documents and monitors issues for effective issue management. This ensures that the project is not hindered and all the problems that come up are tackled. It also records the parties responsible for resolving issues by a given target date.
One can also use this document to facilitate communication with the stakeholders and ensure that everyone is at par regarding a given issue. It is the best means of informing them of a given case for an effective issue management process. The issue log is, therefore, a platform for communicating with the stakeholders.
Lastly, it acts as a repository for past occurrences in given related projects. Therefore, project managers and stakeholders can anticipate some of the issues that may pop up in a particular project. Remember, it is updated regularly as the project progresses, meaning that it captures all the problems arising.
When Should an Issue Log be Prepared?
Remember, this document captures all the issues arising as the project progresses. It ought to be prepared at the project planning stage and used once the project kicks off. It should be one of the first documents to be prepared in preparation for the project’s progress.
However, it is not as pressing as the risk register and does not, therefore, have to be prioritized over all other documents. Issue management begins early but may not be as early as risk management. All in all, these two are still some of the most vital records for project management.
Who is Included in the Issue Log?
We will delve deeper into this when looking at how you can come up with an issue log. However, it is worth mentioning that this document has only two people in it. It captures the person who has identified the given problem and the one responsible for it, also known as the owner.
The owner is responsible for overseeing the issue to its completion, a task given by the project manager. The matter’s identifier is captured if a question or need of clarification comes up in the future. While still on the ‘who,’ it is worth noting that the project manager creates the issue log, as it is a management tool.
The manager should also constantly update it to keep control of issue management, an essential part of any project management practice.
How To Create an Issue Log
We have established that the issue log is an essential document in project management. Even though it is part of the long list of documents used in project management, its purpose stands out, making it a necessary tool.
How then do you create the issue log? Here is one of the simplest breakdowns, which will also help you understand the different components of the issue log.
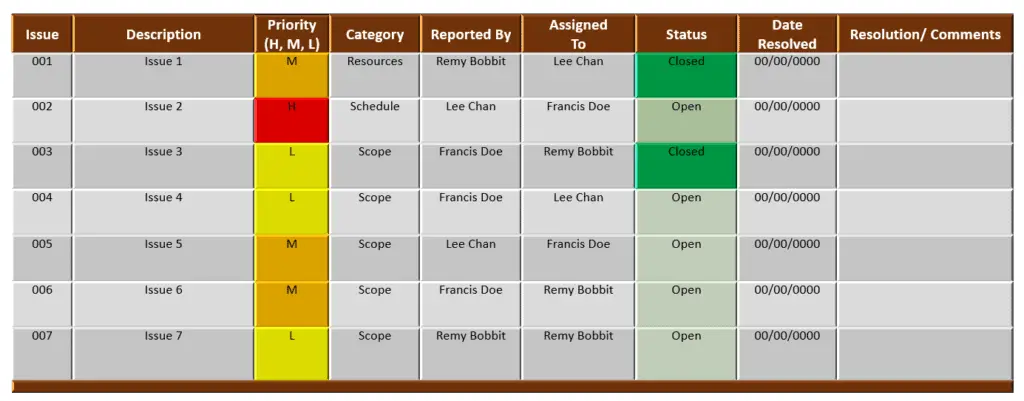
- Write an issue ID
This is usually the first bar in the issue register (you can look at our example). Just like the risk ID, this uniquely identifies each issue that arises as the project progresses. It does not have to be complicated; a number is okay.
- Have an Issue Description
The issue description comes after the issue ID. This is usually a brief statement describing the given issue. It should be clear and detailed. You should avoid repeating the same problem in your log. Clarity allows the person in charge of resolving the matter to understand whatever happened without requiring lots of clarifications. For example, the Shortage of workers is making the project lag behind.
- Indicate the Issue Priority
It would be best to understand that the issue log exists to help in effective issue management, which involves sorting out problems based on priorities. You should prioritize each issue, and just like the ID, this does not have to be complicated.
However, we recommend that you use a color code and prioritize the issues based on their severity. At the top is critical, followed by high, medium, and low. A critical issue is likely to stop the project and must be attended to fast.
High severity indicates that the issue is likely to affect the project’s budget, schedule, and scope. Medium suggests that even though the issue will impact the project, it can be mitigated to avoid affecting the budget, schedule, or scope.
Low means that the issue is likely to create a low impact and is easy to resolve. The issue priority will tell you what to work on first and what can wait. These four severity scales have different color indicators and should not, therefore, be confused.
- Create an Issue Category
Even though this is not as important as the other bars, the issue category helps in a proper organization. You should classify the items into different categories to know which part of the project is affected. These range from resources, schedule, and scope, as these are most affected by issues.
Alternatively, you can categorize the different issues by department or vendor. If possible, you can also define its type.
- Note Who Reported the Issue
You should include a bar for the person who brought the issue into the limelight. This can either be a team member, client, the different stakeholders, or even you, the project manager. Just capture the name and nothing more.
Remember, the person who raised the issue may prove resourceful later as it is being tackled. You may need him/her to answer questions geared towards coming up with a solution.
- Assign the Issue to an individual and Capture it
Someone needs to take ownership of the issue. Therefore, make sure that you include a bar for the person to whom the case has been assigned. However, when doing this, make sure that you choose people with high accountability levels or end up with unsolved items on your list.
Taking ownership of an issue does not mean managing or resolving it but being accountable. Remember, not assigning an issue to an individual means that it may never get solved, affecting the overall project results.
- Record the issue status
You need to record the status of every issue on your list. Has it been resolved, or it remains pending? You can either indicate that it is open, closed, or a work in progress. An issue is open if it has not yet been addressed.
A work in progress indicates that the issue is currently being worked on, and a resolution is forthcoming. A closed problem has been resolved. Therefore, it is not considered an active project threat, and it does not matter whether it has been resolved or not. Remember, the status helps you keep track of resolving the issues.
- Have open date
It is wise to have a time-frame for resolving the issues that may arise in the course of delivering the project. Therefore, capture the date one identified the problem to understand how long it took to resolve it.
- Capture the date of resolution
You have to indicate when the issue was resolved. This is usually displayed as the Date Resolved or Closed Date. From this, you can finally calculate the timeline from start to finish, which will come in handy if you need historical data for your future projects.
- Capture the final resolution and rationale
Remember, you are coming up with an issue log to drive proper issue management. Therefore, we need to see that the issue was handled. Here, you should document the outcome.
Strive to answer whether and how the issue was resolved, any follow-up actions, and any follow-on risks. Be wise to correctly capture all the final resolutions and meet the objectives of the issue log.
- Include comments
Remember to have some space to write down any important information regarding the issue. These can range from how it was resolved, its correlation to other tasks, how likely it is to occur, or the hitches encountered in its resolution.
These are the most critical components that should be in your issue log. However, some people prefer detailed documentation and may include other issues when preparing their issue logs. Here are some extra categories:
- Estimated Resolution Date
Though not necessary, this is a target date for the resolution of a given issue. It promotes fast response and follow-up as no one wants to be behind time. For critical items, this may include a timestamp. Therefore, feel free to have this in your issue log.
- Needed Escalation
Take note that specific issues may require senior management to intervene. They may come in to add more resources or make approvals on change requests. Therefore, you can create a section for this in your issue log.
If you, as the project manager, feels that an issue should be escalated, write a simple ‘YES’ and ‘NO’ if you think that no escalation is needed for the problem.
- Impact
Other people also prefer to indicate the impact of the issue on the project, which may not be necessary for most projects, as this is mainly handled in risk management. Here, one needs to describe the impact of the given issue. Some of the most common are time, cost, and scope constraints.
If you feel that you need to capture the impact of the issue on your project, go ahead.
- Actions
The impact and action part makes this look like a risk register when it is not. You may also choose to record the actions to mitigate, avoid or resolve the issue, though this is not mandatory.
Whatever approach you take in preparing your issue log, ensure that the steps we discussed in the first part are captured. The first ten details are the most important and should not miss in your final template. You can also refer to our example when working on your issue log.
Conclusion
Issue management is a practice that we should always embrace for the smooth sailing of any project. However, it cannot be possible if the issues are not recorded, which calls for an issue log. You can establish just how valuable this document is in overall project management.
As a project manager, you should strive to keep track of all the issues captured in the register and make constant updates.
Click here to download Issue Log Template.